BMW Luxury Touring Community banner

Drive Shaft Install Secret

18K views 40 replies 11 participants last post by  martyg  
#1 ·
What is the secret to installing the driveshaft??? I have spent the last three hours attempting to insert the driveshaft onto the transmission output shaft with no success. In JZeiler's weep hole part c video, he installs it in less than five minutes. At my rate, it may take five hours.

Rob, 2000LT
Navarre, FL
 
#2 ·
When I did my '01, I had to smack it into place with a mallet. You'll hear it snap into place. If you don't, it will slowly move south and make one hell of a racket while driving down the hwy. After that you go get your trailer and bring it home. Ask me how I know this.:frown:
 
#3 ·
Hopefully you have some decent spline lube on the splines and in the shaft opening and a good soft hammer.

It will take a few good whacks to get the circlip to expand and engage. DO NOT hit the end of the drive shaft with a hard metal hammer. I use a weighted plastic hammer like the one pictured and I use the soft end. Just had to say that. Use a piece of wood or other non metal object to hammer on if you don't have a non metal hammer.
 

Attachments

#5 ·
If I recall correctly, the splines will overlap a bit before you hit the cir-clip. That will insure that you're lined up properly. Try sliding the drive shaft over the output shaft and move it gently to see if you can feel the cir-clip hit the shaft. When it does, smack the crap out of it. You might even give it a twist or two to ensure that the splines are engaged.
And like Gordon said, make sure it's well lubed.
Not certain if you can see the clip, but if you can, do a visual to make certain the clip is still in place. It may be gone and that's why you're not feeling it (just a thought).
 
#6 ·
That thing can be a bear to get lined up right. It helps if the pivot pin is still out to help guide it on through that hole with a small screw driver.
 
#7 ·
That thing can be a bear to get lined up right.
Calling the driveshaft a bear to align is an understatement! I finally was able to align and secure it to the transmission output shaft. Thanks to Saddleman for recommending not to attach the swing arm rubber boot until the driveshaft was secured.

I thought I had the job beat until I inserted the right fixed bearing stud onto the swing arm. It turned about four times before it wouldn't go any further without help from the ratchet...bad idea. I now have a stripped swing arm. Any one have a 27 x 1.25mm tap they could loan?

Rob, 2000LT
Navarre, FL
 

Attachments

#8 ·
OK - I have had good luck cleaning up buggered threads by screwing the stud in from the INSIDE of the swing arm. I usually bugger the other stud:eek:.
 
#10 ·
JZ, the bolt screwed in perfectly from the inside of the swing arm until it reached the same patch of buggered thread. Is it possible to muscle the bolt through the bad section in hopes of correcting the thread issue or will it ultimately create a bigger problem? I'm ready to be done with this project, but I don't want to create bigger issues and expenses.

Rob, 2000LT
Navarre, FL
 
#11 ·
Had you installed the swing arm already? I just checked the BMW RepROM and it shows the driveshaft (called the universal shaft) installed first. It then says to push the swing arm over the shaft and forward until the flexible gaiter audibly snaps into place at the gearbox neck.

I haven't checked the Clymer manual yet, but I think John's video showed the swing arm being installed first.

I don't know the pros and cons here, but if the swing arm can be installed over the driveshaft, that seems like an easier way to proceed. I am a few days away from this step ... assuming parts arrive on schedule.
 
#12 ·
Voyager, I successfully installed the drive shaft this morning. Unfortunately I buggered the swing arm thread on the right fixed bearing stud when installing the final drive.

John Z's slave cylinder videos are very helpful along with some typed instructions I had from Saddleman. I'll post the instructions when I go inside. The swing arm goes in followed by the driveshaft. There is very little room to eyeball the driveshaft to ensure it is aligned on the transmission shaft. Thus, the key is to not connect the rubber boot from the swing arm over the transmission shaft until the driveshaft is secured on the transmission shaft. I believe John Z's video shows this, but it is not mentioned. Another thing not mentioned is to place the bike in gear when aligning the driveshaft. If it's in neutral, the transmission shaft will rotate when aligning the driveshaft.

Rob, 2000LT
Navarre, FL
 
#13 ·
If the swing arm can be installed over the drive shaft, it seems like that is the better approach. I will install in that order unless I learn that the BMW RepROM is incorrect in that section. Seems much easier than trying to work through the swing arm, even with the boot free.
 
#14 ·
I've done it both ways.
First time when I drilled my clutch slave weep hole.
Installed the swing arm, then the drive shaft.

Second when I did my clutch.
Wasn't happy with the 'feel' of the snap ring so removed the swing arm (not torqued up, just finger tight) and installed the drive shaft.
Much easier. Better for phase checking too.
Reinstalled the swing arm over the shaft.
All good.

Happy wrenching.
 
#15 ·
I checked Clymer and they also install driveshaft first. So, that how I will do it next week ... hopefully! As you say, that allows easy access and confirmation the shaft is seated and clipped in place.
 
#19 ·
Keeping a close eye on this thread, as I’m seeing it in my future as well. A “used” driveshaft (F&R are on the way).

On a short trip around town, and the 2000 BMW K1200LT starts making seriously scary vibrating noises. It got me home, and I was able to track it down to downstream of the transmission (i.e. speed dependent, even in neutral). Did a quick check of the rear drive at 9-3 and 12-6, no play (what else, it is a low-mileage Saddleman rebuild). Approximately 3-4 “clunks” per rear tire rotation. So off with the rear drive for a look at the driveshaft.

No oil leakage anywhere, inside or out. Popped out the tailpiece. One of the u-joints felt a little notched… but moving freely. Then I noticed an interesting pattern at the base of the spines that strongly suggested the driveshaft had bottomed out there (see red lines in pic).

Put a hose clamp around the end of the driveshaft. Ended up using a hook on the end of a bodywork slide hammer behind the clamp’s screw part to pop out the driveshaft – took several good raps to get it free. First thing I notice is the worn area on one side of the large round surface of the driveshaft, then several smaller areas by the u-joints. (see pic) Parts were well lubed with some white sticky stuff… in cleaning it off, I noticed that the front splines had a strange “wear pattern” (see pic). The u-joints on this end were all a bit notchy, but moved completely. The c-clip was still present.

Looked up inside the swingarm, to check for damage. Didn’t see much (see pic, apologies for quality). Really not wanting to pull the swingarm, but if I need to for a better look, please weigh in…

Looking for speculation on what happened, and what I may want to do to get this squared away. I should note that this is a sidecar rig, and not too many miles ago (but over a year) I “got busy” and let my local dealer replace the rear main seal, clutch, slave, transmission seals, etc. (“while you’re in there…) instead of finding the time to do it myself.

So speculate away… willing to learn from other’s experiences.

Link to pics...
https://imgur.com/a/xXdHAOg
 
#20 · (Edited)
OK, here is some speculation. It appears to me that the driveshaft wasn't "locked” into place as they are supposed to be. This means only part of the splines were engaged and this let them wear aggressively and then allowed the driveshaft to begin to “orbit" as it rotated due to the spline ear and rub against the swing arm. That is my best speculation from the pictures you provided.
 
#21 ·
OK, here is some speculation. It appears to me that the driveshaft wasn't "locked” into place as they are supposed to be. This means only part of the splines were engaged and this let them wear aggressively and then allowed the driveshaft to begin to “orbit"
as it rotated due to the spline ear and rub against the swing arm. That is my best speculation from the pictures you provided.
+1
By the looks of the Strangely worn splines , + Driveshaft bottomed out on tailshaft . I would suspect the drive shaft was not seated into the snap ring Like it was stuck in there & put together. That along with the scuff on the the drive shaft looks like it was not in the center & was flopping around in the housing.
 
#22 ·
I can not add anything to the diagnostic advice of the previous posters. But I will repeat that the drive shaft was NOT properly locked into the output shaft of the transmission. If the splines on the transmission are OK a new replacement shaft will cure all this. Assuming it is properly installed to the transmission. The test is after install, just pull on it - if it comes back out it is not correct.

It was hard to see in your third photo, is there a snap ring further back in the spline area? A missing snap ring could also be the issue. I had to buy one for a used shaft I got off e-bay.
 
  • Like
Reactions: Patric
#24 ·
<is there a snap ring further back in the spline area?>
Yes, on both ends of the driveshaft. The one on the transmission end was apparently never seated properly, and eventually worked its way loose (my guess), and then was forcible jammed back in place crooked while the bike was in motion.

<I'd be having a serious conversation with the service manager>
Overall, very disappointed in the dealer's performance (to the point of considering a small claims court filing to get their attention). My neutral light never functioned again after the dealer visit, and some of the "tupperware" wasn't installed properly. They have definitely lost my business... not that it'll matter much to them. But I've got pictures to show AS PROOF if anyone asks for a dealer recommendation.

I also bought a farkled 2014 F700GS from the same dealer last year... developed a non-leaking but cracked fuel tank ("they all do that") replaced at another local dealer before warranty expired - who informed me that this was the 4th tank on the bike (it only had 777 miles when I bought it - a minor non-disclosure). It then overheated/belched coolant in Albuquerque, NM leaving me stranded for several days; again in Cheyenne, WY (towed to Fort Collins, CO) for several days and a third time as I returned to Houston (this one recorded on my cellphone). BMW claims the bike is "operating normally" (have to top up with several oz. of coolant/week) and I need to break it before they will fix it (suspecting cracked block or faulty head gasket). Sprung for the 4-year extended warranty, so it will eventually be covered (I'm commuting on it to give it multiple heat/cool cycles). As a 28-year longtime BMW rider, THEY have lost any future business as well. A warranty is only as good as the people that stand behind it (or not).

Anyway, I'm hoping someone will convince me that I need to take up the potential challenge of taking off the swingarm for a better look at the transmission splines and how much the driveshaft beat up the inside of the swingarm (nervous because BMW has discovered "lichtbau" (how lightweight you can make something) and I've already got a double-wide sidecar tacked on there... I found the dealer had glued the Paralever pivots in place with Locktite (glad I heated them first, just in case!) - only afraid of what might be lurking in the swingarm bearing assemblies... Just hoping the tranny splines are OK, or the dealer will be hearing from me.
 
#25 ·
You can get up in there and pull the swing arm rubber boot back from the transmission and you will be able to see the splines. I suspect that they are OK and will support a properly installed shaft. You may have to pull the cross member to see it. I can't remember if it is in the way or not.
 
#27 ·
I can see *some* of the spline from the top. However, even after dropping swingarm as low as I dare, can't see the tip of the splines that are most likely to be chewed, or the inside of the swingarm (sidecar brace in the way, perhaps not an issue on solo bike).

So I've been able to pop out the outer swingarm pivots on both sides, and am waiting for delivery of a 14mm Snap-On flank drive socket to tackle those inner bolts. Guess I'll get an Ebay swingarm on order as well, just in case. FWIW, the old chewed up driveshaft made an admirable "cheater bar".

Since I've got a significant amount of tupperware off, I think it would be wise to go through the dealer's work (have already found an unplugged set of connectors and a leaking valve cover gasket that was just replaced. Also do an early annual service and valve check (dealer replaced timing chain sliders, so had the cams/shims out).

Did I mention the garage is well over 100F?
 
#28 ·
I don't want to scare you but I busted a Snap-on 14 mm flank drive socket trying to remove a pin on the swing arm. I had used a regular 14 mm impact socket the first time I rounded one off so I bought the Snap-on flank drive and it worked well for about three jobs then it snapped. Then my friend made me one out of a Snap-on flank drive impact socket with a machined press fit sleeve on it. It has done very well on at least 6 jobs so far.
 

Attachments

#33 ·
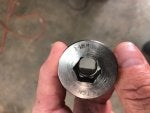
Results so far have been disappointing. Despite hitting the bolt and surrounding area with 15 minutes of propane heat prior to attempted removal, the brand new Snap-On socket (impact, 14mm flank drive) first deformed the sides of the flats of the bolt, then turned the swingarm bolt into a roundy-roundy bolt. Good news is that I still have one good bolt remaining on the other side, which would be enough to remove the swingarm, IF successfully removed. Bad news is that I'll now need to wait for Snap-On to warranty the currently useless socket before proceeding further (not sure how they are on warranty returns), and will need to order a new bolt from BMW (for which they are very proud, and may take a long time to source, based on some other odd part orders for 2000 K1200LT).

So thoughts on moving forward... not a lot of good options...
1. See if I can get my Dremel blade in there, and cut a deep slot into the head for my old style "manual" impact driver (pound with hammer). Not sure if even feasible, and not a lot of hope the Chinese steel bits can develop enough torque to remove it, if the Snap-On socket couldn't. But perhaps the hammering/impact can break something loose.
2. Go buy some high quality drill bits and a fat Easy-Out, and go that route. Downside is that if Easy-Out breaks off, I'm screwed.
3. Put enough bits back together "loosely" to put it on my trailer and haul it up to the dealer to have that "talk" with him about the driveshaft that wasn't properly seated on the trans output splines. Downside is that I really don't want them touching the bike anymore...
4. Same as 3, but haul to a machine shop for help with either/both of the swingarm pivot bolts. Downside is timing (probably have to take a day off of work), expense, and their inexperience with BMWs and things metric.
5. Remove as much hardware as I can to see if I can get a complete view of the current transmission splines for evaluation (+/-). If they are suspect, the swingarm will HAVE to be removed somehow. If OK, dare I put things back together as is?
6. Wait for the new/replacement Snap-On socket, say plenty of prayers, heat the remaining good bolt for 30 minutes (while saying some more prayers), and try again of the remaining good bolt. If that one fails, not sure where to go next (#2 or #4?)

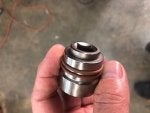
Note that this assembly was out approximately a year ago at the dealer for a rear main seal replacement, so it shouldn't be corroded in place (dealer may have used Lock-tite, unfortunately, which is why using much heat).
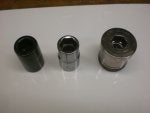
Pics...

Image


Image
 
#35 ·
If the dealer put it on too tight, I would take it to them to remove.

Otherwise, I would try a modification next time and try the other side. The heat should have been plenty if Loctite is the issue. It sounds like these were grossly over tightened in addition to possibly have Loctite on them. I would heat well again as you did, trying to heat the housing more than the bolt. You want to expand the housing away from the fastener. I would use the impact socket and coat the inside with rubbing compound to enhance the grip on the bolt head. And I would use an air impact wrench along with the socket.
 
#34 · (Edited)
I have had good luck using "outside" easy outs on these. I would hammer it on and then use an impact gun on the socket to drive it out. I always keep a set of pins in the parts bin and I often find them on e-bay quite cheap. You only need one of the pins out if you also remove the exhaust as the swing arm can be removed with one pin stuck in place. Then you can get a pipe wrench or large vise grip on it off the bike.

I hate it when people use loctite where it is not supposed to be. It is even worse when people lube the fitting and then torque it to 160 Nm wet when it should be dry. That causes over torque. Good luck. I got the outside easy out at sears years ago but I am sure you can find them. They will be destroyed in one or two uses though as you can see the marks on this photo.

On initial removal I always use a 1/2 breaker bar with a 4 foot length of aluminum pipe. I make sure the socket is help square to the pin and then in one fell swoop push the pipe as hard as I can quickly. I have found the slower you go the more chance of rounding.
 

Attachments

#37 ·
Irwin 9/16"/14mm external easy out (bolt extractor) on order as part of a set on sale at NAPA right now. Should be here Tuesday. Waiting for response from Snap-On as to how to replace socket. Ordered an electric impact wrench (1/2 drive) from Northern Tool/Great Neck. Fully expect it to fail to budge anything, but worth a try. Working on an Ebay set of replacement swingarm hardware. There will be a slight pause while waiting for parts/tools and the heat to subside a bit. Thanks to all for the advice and assistance.
 
#38 ·
Don’t forget the rubbing compound. The extra friction from the grit is substantial.
 
#39 ·
OK, I have at least been PARTIALLY successful. The unmolested left swingarm pivot bolt was successfully removed with a combination of new 14mm Snap-On socket (warranty replacement), Great Neck (Northern Tool) 1/2" electric impact wrench, rubbing compound, propane torch heating, reversing tighten/loosen action and prayers. So I know at this point, I can theoretically remove the swingarm by removing the exhaust system... lots of work, BTDT before.

As for the RIGHT swingarm pivot, it continues to defy all efforts. The Irwin 14mm/9/16" external bolt extractor is still intact, and still chewing into the remains of the bolt head. I'm still not sure why they put a 3/8" drive on it, although it has an external 7/8" hex as well. I have successfully busticated a 3/8" drive breaker bar, and FOUR different 3/8" to 1/2" drive adapters (SK, Crapsman, Pittsburgh and Husky - all lifetime warrantied or soon to be warrantied) when I switched to the 1/2" drive breaker and a 4-foot cheater bar. Neighbor will loan me his 7/8" 6-point 1/2" drive impact socket tomorrow, and I squirted some PB Blaster penetrating oil into the general area to soak overnight. Will hit it with another healthy dose of heat tomorrow evening, and then see where the next "weak link" will be when the adapter is out of the equation. Hoping the bolt finally yields...

As for the Great Neck electric impact wrench, I'm still undecided. It *did* take off the left pivot bolt (barely), but failed miserably on the right one.

I keep looking at those 18 year old bearings that support the swingarm pivots... and wonder if I should consider removing/replacing them, or at least taking out to re-grease? I can't imagine they move much (if at all), so probably doesn't matter much as long as I lube the pivot bolts/inner bearing race well. But I keep thinking of how quickly the paralever bearings at the other end of the driveshaft get notched. If I need to replace the transmission due to damaged output splines (i.e. further delay), I'll have to consider it.
 
#40 ·
OK, I have at least been PARTIALLY successful. The unmolested left swingarm pivot bolt was successfully removed with a combination of new 14mm Snap-On socket (warranty replacement), Great Neck (Northern Tool) 1/2" electric impact wrench, rubbing compound, propane torch heating, reversing tighten/loosen action and prayers. So I know at this point, I can theoretically remove the swingarm by removing the exhaust system... lots of work, BTDT before.
Had the same issue on mine - I DID need to remove the exhaust, drive shaft, etc. and was able to muscle the swingarm out by tilting it down on the side where I actually could remove the pivot bolt.

Turned out to be an absolutely DESTROYED bearing - everything was so bound up in there that I don't think it would have ever been able to be popped loose. Once I had it out and on the ground was able to remove the pivot bolt "easily" with an open ended wrench/easy out and pry bar. Of course needed to be replaced after that....

I blamed it on SEVERE over-tightening during my last (dealer) change of the clutch...
 
#41 · (Edited)
Sorry for the delay (life intervened) and much appreciation for all the help.

Ended up having to purchase a 7/8" 1/2-inch drive impact socket for the external "bolt extractor". Heat + bolt extractor + 7/8" socket + 28" 1/2"-drive breaker bar + 4-foot metal gas pipe cheater bar. Finally a loud POP that turned out to be coming from none of the hardware or my body. Bolt removed - a success. After cleaning all the spline lube away, even better news... trans splines look OK!!!!!!

https://imgur.com/nTLMwzL

https://imgur.com/ExtZIzd

Have "new" (Ebay) parts in hand, will commence re-assembly as soon as I finish up some other "Tupperware off" projects!!!!

FWIW, the u-joints from the partially disengaged driveshaft took out some of the inside of the swingarm tunnel... (glad I bought a replacement) and had also polished part of the inside end of that difficult swingarm pivot bolt. Guessing some of that deformation may have been part of the cause of my issue. Locktite residue was also observed. FWIW, had a discussion with my local dealer about this state of affairs that happened within a thousand miles of them replacing rear main seal, clutch, etc. (but it's outside the 1-year warranty period), while the locking ring on the transmission end of the disengaged driveshaft is still intact and functional. Zero satisfaction there. My policy has been never to let dealers work on my bikes, and I just learned a very expensive lesson in why I shouldn't have changed that policy. This local dealer will never see me again, and I will happily explain to others why, if asked.